
CORS
This page will show you the options to configure CORS (Cross-Origin Resource Sharing) response headers for your site. Refer this MDN link
for more details.It is a mechanism that allows a server to indicate any origins (domain, scheme, or port) other than its own from which a browser should permit loading resources.Note: For demo purpose, we will be using www.nviztest.com domain as an example.
Prerequisite#
- You must have a domain configured on Nitrogen.
Steps#
Click on
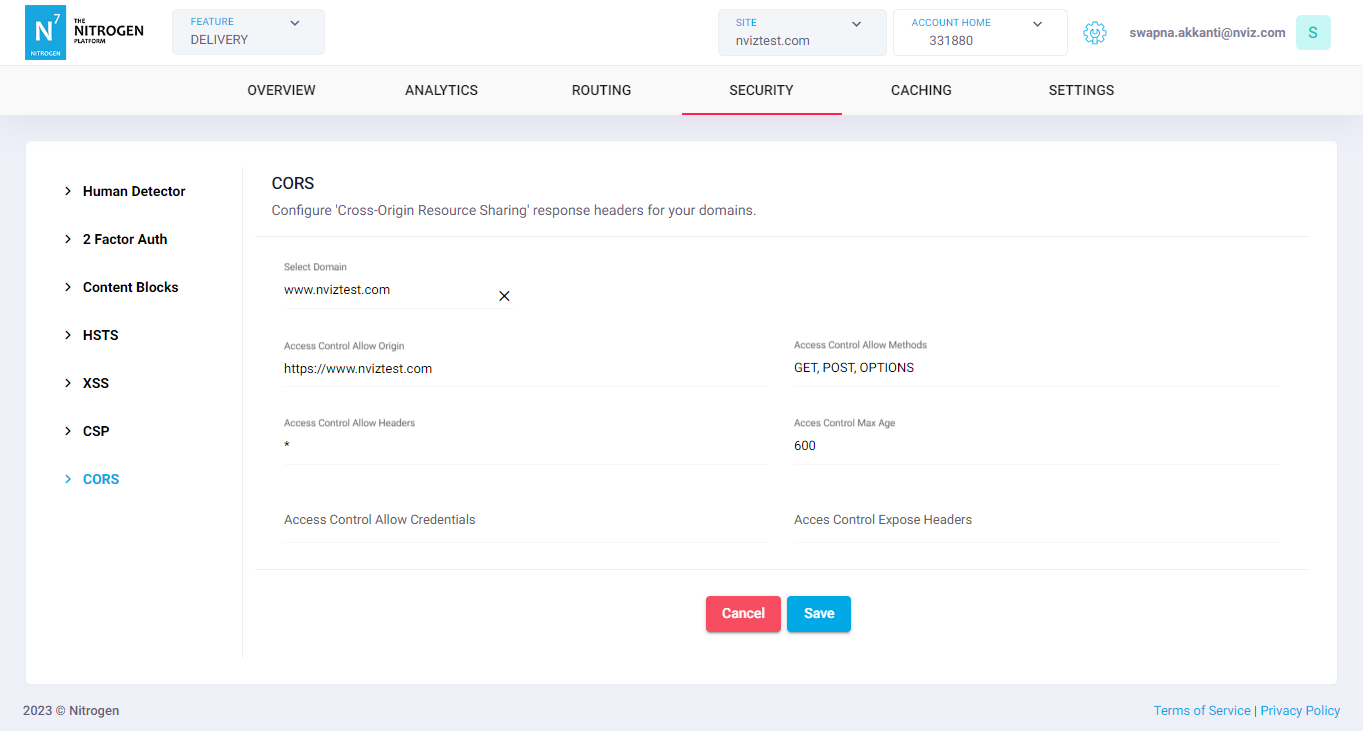
Securitymenu, and openCORStab.You will be taken to screen to provide details.
Access Control Allow Origin: It indicates whether the response can be shared with requesting code from the given origin.
Enter the desired domain name. e.g. https://www.nviztest.com
Note:- Only one domain name is permitted.
- Refer this MDN link
for more details
Access Control Allow Methods: It specifies one or more methods allowed when accessing a resource in response to a preflight request.
Enter the desired method names separated by comma. e.g. GET, POST, OPTIONS etc.
Note: Refer this MDN link for more detailsAccess Control Allow Headers: It is used in response to a preflight request to indicate which HTTP headers can be used during the actual request.
Enter the desired header names OR enter * to allow all.
Note: Refer this MDN link for more detailsAccess Control Max Age: It indicates how long the results of a preflight request can be cached.
Enter the desired number of seconds. e.g. 60
Note: Refer this MDN link for more detailsAccess Control Allow Credentials: It tells browsers whether to expose the response to the frontend JavaScript code when the request’s credentials mode (Request.credentials) is include.
Enter the desired value. e.g. true
Note: Refer this MDN link for more detailsAccess Control Expose Headers: It allows a server to indicate which response headers should be made available to scripts running in the browser, in response to a cross-origin request.
Enter the desired header names e.g. Content-Encoding, Content-length OR enter * to allow all.
Note: Refer this MDN link for more details
Click on
Savebutton.
Notes#
These changes will only take effect when deployed. Saving them will only be saving them in draft. Please refer documentation about Deploy process for it.